Sunday, May 17, 2015

Final Project and Storyboard

Proposal/Abstract

For my final project, I wanted to create a detailed 3D model of a car tunnel. One of the main goals of this project was to make  the car tunnel look as realistic as possible.

Pre-Production and Storyboard

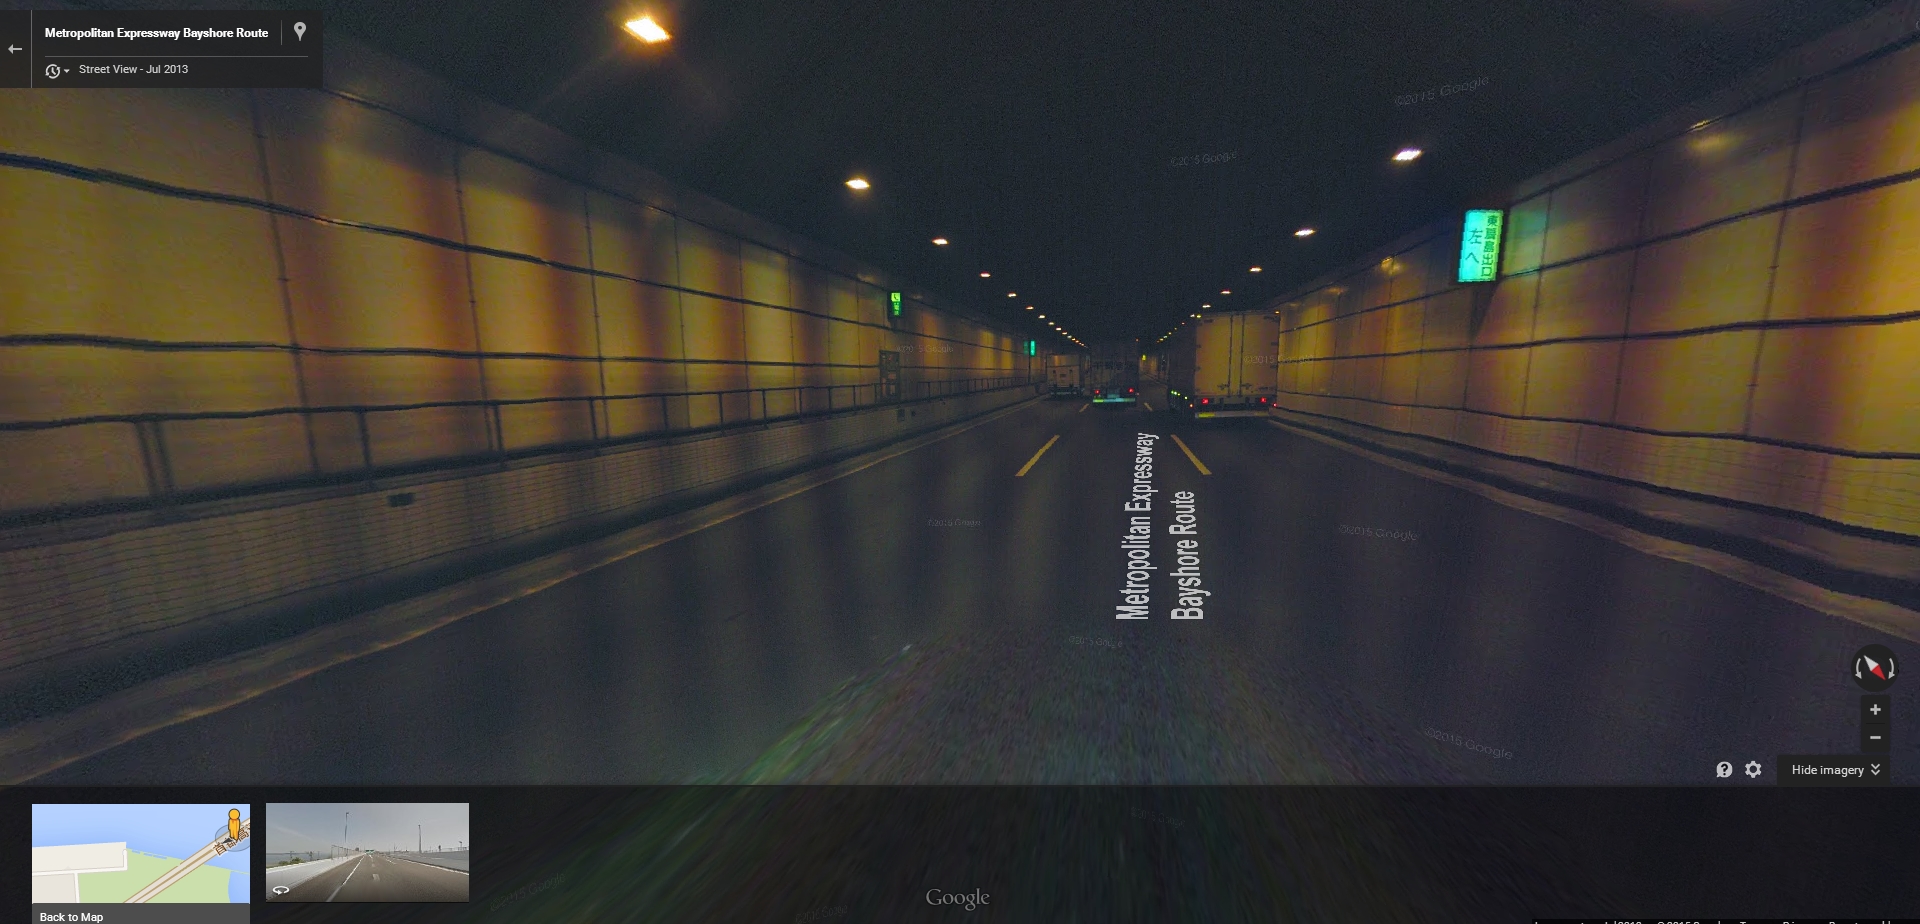
For my research, I looked at many different pictures of car tunnels to get a grasp of how a realistic one should look and feel. I also looked at the street views of car tunnels on Google Maps to make so I wasn't simply looking at polished photos. In addition, I also tried to look for car tunnels that were made in a 3D program to help me get an idea of my expectations/limitations.


After looking into different car tunnels, I drew up a storyboard for what my final project should include.

Displaying photo.JPG

Though I realized that animating a car to go through the tunnel was a lot more work than I could do for my project, I tried to get as many details as possible. I wanted my car tunnel to feature a pathway to walk on the side, a place for an emergency phone/fire extinguisher, an emergency exit, and lights that accurately portray a real car tunnel.

Production

First, I created the overall structure of the tunnel. At first, I had a straight tunnel that lead into a curved tunnel. I created the straight tunnel with some NURBS cubes and created the curved tunnel by extruding a bunch of curves. Although I was able to lay out most of the parts in the curved tunnel, I realized later on that some parts were a bit too hard for me to create without some parts out of place. I looked into many tutorials about how to work with curves but I think I needed extra help to continue after a certain point.


I started creating the walking path on the side with NURBS cubes. I also made the staircase with NURBS cubes and made sure they were about an equal length in difference between each step. After that, I created the railings for the side of the walkway. These were made with many (many) NURBS cylinders. The tricky part with these was creating the railings that went down the stairs. Getting the right angle and size was difficult. In addition, I had to open part of the railing for the fire extinguisher. I also made sure I created small paths along the side of the road. These weren't exactly meant to be walked over, but I noticed many car tunnel images had these paths on the side.


After the walkway was created, I made the emergency exit and fire extinguisher. This was created using NURBS cubes and spheres. The sphere was cut in half similar to how the emergency lights were in Japan. The signs above them were also made with NURBS cubes.


After the all the solid parts of the tunnel were created, I started working with the lights. I felt that they were more important than the textures because of the overall atmosphere it created. I experimented with many different techniques, sizes, colors, and depths until I got a result I was satisfied with. This came with researching as many lighting styles as I could online.


In the end, I used many spotlights and area lights for the project. I gave them a slight orange tint and made sure they decayed in the right places. I had the lights arranged so that one of them was facing diagonally downward and another one was facing the opposite direction. This was done to make the light source look realistic. In addition, I had area lights facing upward to increase the amount of overall light in the top-half of the model.


As seen in the previous pictures, I also added lights to the fire extinguisher and signs. These lights were point lights that were placed inside the NURBS primitives. I made the texture of the primitives a bit transparent and added the point light to make the object look as though it was glowing.

When working with the textures, I used many images to create the environment I wanted. This step was actually easier than I thought. The only parts I needed to worry about was making sure the color fit well. I also had to angle each texture in the right way and manipulate the UV's to make sure the object didn't look too artificial. I think the hardest part was creating the working with the lights to make sure emergency signs looked realistic.


In the end, this is what the tunnel looked like.


Self-Evaluation 

I think the biggest flaw of my project was that I was late. This project took much longer than expected, and I felt like I didn't have something that was presentable on the day of the final exam. I just didn't have enough to show, especially with the other final projects I had at the time. I also think I could have improved my project by having textures that I created by myself. Most of the textures were taken online. Though they weren't "perfect" for my project, I think I manipulated the images enough to make it work with what I had. I also could have improved the project by creating more realistic lights. I think the lighting itself is fine, but I didn't create a solid model for the actual light. Part of the reason why I didn't/couldn't do this was because of my lack of experience of working with lights inside objects.
But in overall, I think I did well on the project. I fleshed out many details to make the tunnel look as realistic as possible. I tried multiple lighting techniques to make sure I achieved the atmosphere I wanted. I went through many images to make sure my textures had the right color and design. In the end, I had about 171 different objects in my project.


References, Sources, Tutorials I used

https://www.youtube.com/watch?v=u5jQqsiUlHQ
http://web.cse.ohio-state.edu/~parent/classes/682/WI12/TechReports/lighting.pdf
http://buzzking.me/?p=486
https://www.youtube.com/watch?v=UIrwCTqKLvo
https://www.youtube.com/watch?v=P03lybXiYxo
http://help.autodesk.com/view/MAYAUL/2015/ENU/?guid=GUID-9E35F145-67E8-44A0-9EFB-E1959199010E

Friday, May 8, 2015

Lowman Animation

For the Lowman Animation, I made the character do a little wave. I tried to manipulate the fingers a little bit as well when editing the wave. As it reaches the end of it's wave, I made the fingers continue to move for a very short period of time. This gave the wave a more realistic feeling by portraying the physics of motion. Since the wave itself was very simple, I also tried to give the character a more natural pose. I made it lean to one side, opened up its arms a bit, made the upper torso lean in the opposite direction of the hips, and opened the mouth to give him a more relaxed look. Though some parts of his body were easy to edit, other parts left me a bit confused. His eyes and eyebrows were a bit tricky for me to animate. I couldn't get them to move in the way I wanted them to.


Friday, May 1, 2015

Shaders/Lighting/Rendering

For the texture exercise, I experimented with many shaders and lights to get a sense of what I could use for the final project. I tried using different 2D bump maps and worked with different lights to see what I could use for my final project. One of the textures I particularly liked working with was the ocean texture. I thought it was cool how you can manipulate many parts of the texture to create different waves and intensities. For the lights, I particularly liked working with the spotlight. I felt like it was the easiest to manipulate and had a lot features to work with compared to the other lights. I could see the spotlight angles and dropoff rates creating cool 3D renders.


Tuesday, March 24, 2015

Midterm Documentation

Abstract

I have created a portfolio of my projects that have been completed using the skills and knowledge I developed in class.

Production 

For the first project, we created a model by only using NURBS primitives. I decided to create a television remote by using cubes and cylinders. I used the Sony remote below as a loose reference for this project. Though the project itself isn't very complex, it required over 40 NURBS primitives to complete the model.


For the second project involved creating a model by manipulating CV points. At first, I tried to make a simple face. I thought it would be easy but it didn't turn out the way I wanted it to. Instead, I decided to create a model of an hourglass. In order to get the hourglass shape, moved the CV points for two spheres. And then, I gave the hourglass a blinn material and reduced its transparency. This gave the spheres a glass-like texture and a slight reflection of light. 


For the third project, I created a pocket watch. I tried to incorporate CV's into the project but I realized it wasn't particularly deal for any part of the model. I based my model off of a picture I found of a pocket watch online. The hardest part of the project was creating the numbers on the clock for the model. It required the creation of polygonal text and moving each roman numeral to its correct position and angle. 


For the fourth project, I expanded on my second project after learning about how to work with curves. Instead of having two floating spheres, I re-created the glass part of my hourglass by using a curve. In addition, I added a wooden texture to the hourglass to make it more realistic. 


Self Evaluation

I think my weakness with these projects is that the objects I chose were not particularly the most complex. There weren't many difficult curves or CV's that I needed to manipulate. Part of the reason was because I would have ambitious projects that I would start on but never end up completing because of its difficulty. Now that I have more knowledge and tools compared to the start of the class, I may be able to complete some of my previous projects.
However, I still think I did a decent job for each model I created. Although there weren't many complex parts, I made sure to get all the important details for each project I created. I made sure to use proper references and do some self-research for certain tools in Maya to achieve the textures and shapes I wanted.

Tuesday, March 10, 2015

CV Curves

I applied my knowledge of CV curves to my first project when I created the hourglass. Instead of having two spheres that weren't connected, I created a curve that would resemble the glass part of an hourglass. I revolved the curve to create a surface, changed it's surface color and transparency, and added a texture to the rest of the hourglass to end up with the images below.


Tuesday, March 3, 2015

Third Project Model

I wanted to create a pocket watch for my 2nd model. I was trying to modify the CV curves on this project but it honestly would not shape into the way I wanted it to. Instead, I left the object alone and left my CV point experimentation with my first project. This 3D model was created using NURBS primitives and polygonal text.


Tuesday, February 24, 2015

Bouncing Ball Tutorial

For the Bouncing Ball Tutorial, we learned how to create basic 3D shapes, add character and movement to those shapes, assign different textures and materials to the surfaces, and finally add special particles to the animation.

The first lesson was fairly simple. We created the required shapes for the animation such as the sphere, torus, and plane. The size and dimensions of each shape was better created by turning of interactive completion.

The second lesson was a little bit harder because the concept of movement and time was introduced. We learned about the ability to set the ball at different locations during different frames. Though I think moving the ball was fairly easy, the hardest part (and maybe the hardest part of the whole project) was getting the ball to bend and squash. I'll probably have to look back at my notes if I want to work with tangents and the deform tools.


The third lesson was actually easier than I thought as well. Adding textures and materials to each shape's surface was fairly simple. This was especially the case if you were using a simple colors and designs. Adding an image file to the sphere was probably the trickiest part since you needed to rotate and scale the image for the sphere to look right.


The last lesson was the hardest overall. We learned about how to add special particles and create different lighting for the animation. Though it's simple to create each effect, I can see the amount of depth and potential when it comes to fully fine-tuning each effect into the way you want it to appear.

Overall, I think the Bouncing Ball Tutorial helped me greatly with my knowledge of Maya and knowing where to find the basic tools to help me with my 3D modeling and animation.